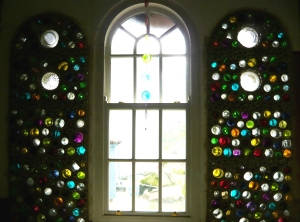
It was finally time to finish off work on our bottle wall sections this week. We have written a few posts about bottle wall construction over the last few months, and now it was time to add the finishing touches to our largest project. We found a lovely arched sash window as a second in a local joinery and decided to add a bottle wall arch to each side of it for a beautiful composition and also to add more light into our extension.
The final layer of cement was added to the inside and outside of these sections about ten days ago, just rendered up across the sections, bottle bricks and all. We then removed the cement from the bottle bricks and smoothed the wall with our hands for a flat, sleek finish. We let the cement set over night and used a wire brush around the edges of the bottle bricks to clean them. We then used non abrasive scouring pads to clean and polish the bottle surfaces and the blue mosaic pieces.
After this the walls looked nice but something was still missing. We wanted more colour. Most people admire multicoloured stained glass windows and we wanted to recreate something of that feeling in our build. Finding coloured bottles is quite difficult and there is only so much Swedish raspberry vodka one can drink to get red bottles. We went out and bought some glass paints.
First we cleaned the surface with methylated spirits, and put the paint on in a thin layer. It is important to spend some time deciding where the respective colours go for a balanced look. As our walls contained a lot of green and brown bottles already we went for blue, turquoise, purple, red, orange and yellow paint. Each bottle brick needed two or three layers of paint. It is a little bit tricky to get the paint even but thin layers works well as a thick coat is likely to drip and run.
We are pleased with the results. The paint is quite expensive to buy but goes a very long way and we think you agree when we say it has made our walls even more beautiful. Now the bottle sections are finished we can concentrate on finishing off by painting the walls around them in a crisp white.
Making a wall out of bottles and jars takes a long time. Cleaning, matching and taping the bottle bricks, building the wall and adding the finishing layer of cement before cleaning, polishing and painting the glass bricks. But if you are looking for a cheap, environmentally friendly, unique feature in your home it is well worth it. We have built two more walls in our extension in the same way and all together they look great and help create a bright, happy and special place. We like a multicoloured style but you could easily go for something more restrained, perhaps all the same type green wine bottles in a square grid for a sleek contemporary look.


beautyful work !
LikeLike
Thanks Christiane. Hope you can visit again some time! Your own garden is looking great.
LikeLike
Omg.i came across this.and it’s exactly what I do..I’ve been obsessed with making bottled glass walls and windows for the past few years.its the effect after it is finished I love even though it is very hard and skilled to do I still love it.not sure how many others in uk have in their garden what I have.be interesting to know.
LikeLiked by 1 person
Hello. So nice to hear about your bottle walls and windows! You are right about the effects after it is finished and it lasts forever. So beautiful. It is hard work but so worth it. 🙂
LikeLike
hello this is a very beautiful house.
I’m making a bottle window and want to know the best filler to use with glass wall.
my thoughts are;
cob? Adobe? lime mortar?
I have very sandy soil and wonder if I need to add lime to make sure it doesn’t crack. I plan to add straw or shredded bamboo leaves in the mix for extra strength.
it’s midwest france. temp minus 20°c to 45°c.
LikeLiked by 1 person
Hello! Thank you.
We are not sure what would be the best materials for your area. When we built our glass bottle walls we used insulatation as a filler and to keep the house warm. We used sand and cement in a thin layer on the inside and outside, to hold the bottles in place and a frame from wood for each section, and it has been perfect for about seven years now. Cement is not the best from a sustainable point of view but we made a compromise as we live in a very wet climate and are not sure how well other materials would hold up to the elements. You will probably need to do some research and try to find others who have used different materials in your area and see what works. Because of the layer of insulation used in our wall the total amount of cement was small and we are very happy with the results. Hopefully you can make it even more eco friendly. Good luck and do share some pictures if you like. 🙂
LikeLike